All posts by BudgetEpicurean

Long-time student turned young adult with varied interests, mostly food and frugality. Pursuing wealth so I can help others pursue health.

Happy Easter!


Happy Easter everyone!  I hope today is filled with family and food and cute woodland creatures, and maybe some chocolates too.  But don’t get too crazy.  Remember, Easter & Halloween are dentists’ favorite holidays.

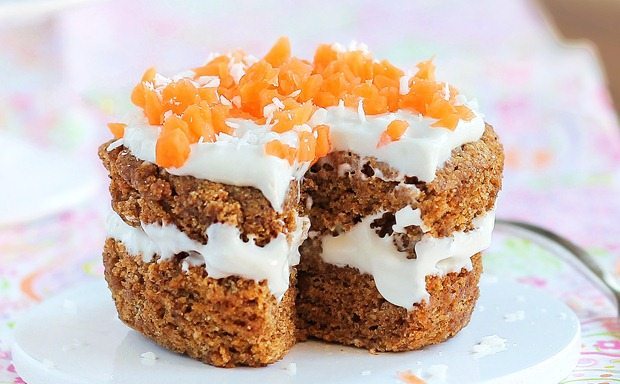
I will be enjoying the day with family, having an egg hunt, dying hard boiled eggs, eating some ham, and yeah probably having more than a few pieces of candy. 🙂  (Oh, and don’t tell, but I totally want to surprise everyone with this unbelievably easy [microwave only!] carrot cake recipe and healthy cream cheese frosting!  I really hope it is as delicious as it sounds.)

Enjoy the roundup below of creative, healthy ideas to make this the best Easter ever!


Natural Easter Egg Dyes from Rodale’s Organic Life

natural easter egg dye

How to Make Vibrant Naturally Dyed Eggs

50 Non-Candy Egg Stuffer Ideas

40 more Non-Candy Ideas

40 Egg-cellent Non-Candy Easter Egg Fillers

No One Will Guess These Easter Brunch Recipes Are Healthy

Easter Brunch

If they're going to be on your Easter table, they should totally look pretty. Get the recipe from Delish.

And of course, we can’t forget the CANDY!

50 Homemade Easter Candy Recipes

50 Homemade Easter Candy Recipes

15 Healthy Easter Desserts


Image at the top of page from HERE.

Peach Oatmeal with Kefir


Some of you reading this may be thinking “what in the heck is kefir“?, and, “How do you pronounce that?”, or maybe, “Oatmeal is awful boring goop.”

Well, I have heard it pronounced both “kef-eer” and “keef-er” and I don’t have a strong opinion on which is correct.  If anyone knows for sure feel free to comment below.  But call it whatever you want, what it is a superfood that has many proven health benefits of kefir supported by research.  It is essentially fermented milk.

Now, before you go all “ewww, fermented stuff is gross!” hear me out.  This is a drink which has been around for many many years, used by different herding cultures and passed down through the ages.  Many peoples mostly lived on milk from their herds as they were nomadic, and they would store milk in leather pouches for days at a time.  This would gradually ferment into a sour, thicker, yogurt-like liquid that they could store even longer.  These people were known for their health and vigor.  “Elie Metchnikoff, a Nobel-prize winning biologist at the Pasteur Institute, first suggested that lactobacilli might counteract the putrefactive effects of gastrointestinal metabolism in 1908. ” (source)

The fermented milk would contain chunks of symbiotic cultures of various lactobacilli (a type of bacteria), yeasts, and other microorganisms which are useful for healthy digestion.   For those with a scientific curiosity: “Microorganisms present in the grains include lactic acid bacteria, Lactococcus lactis subsp. lactis, Streptococcus thermophilus, Lb delbrueckii subsp. bulgaricus, Lb helveticus, Lb casei subsp. pseudoplantarum and Lb brevis, a variety of yeasts, such as Kluyveromyces, Torulopsis, and Saccharomyces, acetic acid bacteria among others. ” (source)

Kefir has antibiotic and antifungal properties. It’s been used in the treatment of a variety of conditions, including metabolic disorders, atherosclerosis, and allergies, tuberculosis, cancer, poor digestion, candidiasis, osteoporosis, hypertension, HIV and heart disease. It may also help restore a better balance to the gut flora, alleviating conditions such as diarrhea, constipation, gas, and bloating.  Many lactos-intolerant people also find they are able to drink kefir without difficulty, as the fermentation breaks down much of the problematic sugars in the milk.  If you’re interested, feel free to read about the differences between kefir and yogurt .

In addition to beneficial bacteria and yeast, kefir contains many vitamins, minerals, amino acids and enzymes.  Among these small health benefits are: calcium, phosphorus, magnesium, B2 and B12, vitamin K, vitamin A and vitamin D, and many amino acids.  In particular, tryptophan, one of the essential amino acids abundant in kefir, is well known for its relaxing effect on the nervous system.  Kefir in the diet can have a particularly calming effect on the nerves due to this and other salts important for a healthy nervous system.


Peach Kefir Oatmeal Ingredients

So now that I’ve hopefully convinced you to give kefir a chance, how do you get it into your diet?  Well, of course one option is to just eat/ drink it as if it were yogurt, as a snack or part of a meal.  You can also use it like milk and pour over cereals for breakfast.  You can whip it up into a smoothie just as you would with water or milk.  Or you can try this delicious recipe to make Kefir Oatmeal!

Ingredients:

  • 1/2 can of peaches (in juice or water, not syrup, or home canned)
  • 1/2 cup water
  • 1/2 cup oats
  • 2 tbsp – 1/4 cup kefir
  • Optional: Sprinkle of cinnamon

Peach Oatmeal with Kefir

Step 1: Pour the oats and water into a bowl with the peaches, and microwave on high about 3 minutes.  You can also cook this in a slow cooker on low overnight, or simmer on the stove top for 5-7 minutes.  Feel free to use any type of fruit you have and like here, frozen berries work well, as do bananas, pears, cherries, or apples.

Cinnamon vanilla peach kefir oatmeal

Step 2: Sprinkle on some cinnamon if using, stir well.  Let the oatmeal sit and soak for a few minutes.  When it is cooled enough that you can put your finger in it and not get burned, add the kefir and mix it in.  (You don’t want to boil alive all the healthy micro organisms we just talked about!)

You can also make this at night, and let it sit at room temperature, covered, overnight for some extra fermentation.  You will get great digestive benefits from both the whole grain oats and fiber as well as the beneficial bacteria.  Add more or less kefir to your own tastes based on how sour you like it.  If you absolutely must, you can add in some maple syrup or honey, but I like it just plain as is.  Enjoy!

Green Tea Matcha Latte


Now, I know matcha powder has been around in culinary circles for a long time, being used in everything from baked goods to ice cream to beverages.  And it has been around long before that in Japan as a highly antioxidant-rich drink of choice.  Matcha goes back many centuries in China and Japan, where it was first made as dehydrated and crushed bricks of tea leaves for storage and travel.  Zen Bhuddists drank this tea in a ceremony prior to afternoon meditations, and found it enabled them greater clarity and sustained energy unlike anything before.

Powdered tea was made in very small batches, such that the expense meant only royalty could enjoy it.  However, a new harvesting method soon enabled more efficient processing, and as the price became more affordable matcha became available to the public.  By the 16th century, all levels of people took part it drinking tea and tea ceremonies to some extent.  To learn more about how to make the perfect cup of matcha green tea, and for a brand review and comparison, check out this site.

Frothy green tea latte

Many claim matcha is a great replacement for coffee because it is so high in antioxidants, yet still packs quite a punch, as one teaspoon of matcha contains 70 mg of caffeine (approximately the equivalent of a half a cup of coffee, which typically contains about 160 mg).  If you make or order a “koika” or “thick tea” this is made with twice the amount of matcha powder, and thus twice the caffeine content.  A high quality matcha powder will be bright green, and smell earthy and complex.  This is a fun drink to serve up for St. Patrick’s Day, or the day after when caffeine is maybe needed…

This recipe is a very simple one, which you could easily make at home, bleary eyed first thing in the morning.  Which is great, because that is when I made it!  I chose to use vanilla flavored milk, you could also use a vanilla bean or vanilla flavoring, or try something else like mint leaves or peppermint extract.  Or you can leave your latte plain and savor the complex flavors of the matcha.  I also used one medjool date as my sweetener, try agave nectar or pure maple syrup for something different.

Ingredients for a sweetened vanilla Matcha Latte

Ingredients:

  • 1 teaspoon quality matcha powder
  • 1 medjool date, pitted
  • 1/4 cup water
  • 3/4 cup almond or soy milk
  • Optional: use flavored milk, or add the seeds from one vanilla bean or 1 tsp of vanilla flavoring

Dates in boiling water

Step 1: Put the water in a small sauce pan with the cut up, pitted date and bring to a boil.  This just softens the date in order to make it blend more easily.  Pour the hot water into the blender and blend on high for 30-45 seconds.

Matcha latte in a blender

Step 2: Add the milk to the sauce pan and bring to a simmer.  Add the teaspoon of matcha to the blender.

Foamy matcha latte

Step 3: Add the hot milk, and blend together for 30-60 seconds to make it nice and frothy.  You can of course whisk it instead, purists use a bamboo whisk, but I am far too lazy for that. 😉

IMG_3401

Step 4: Pour into a mug, and enjoy!  The blender makes a light, bubbly layer on top, and enables the incorporation of the date.  It would be much harder to crush it up yourself, so if you are using a whisk you should probably use a different, liquid sweetener.  This is best enjoyed immediately, still steaming from the stove.


[amd-zlrecipe-recipe:49]


Irish Colcannon


Happy <nearly> St. Patrick’s Day!  Can you even believe it is already almost time!  For me it seems like the year is flying by, as it usually does.  The East Coast had a glimpse of spring and all its sunny, 60-degree glory, followed by chilly weather again.  Those daydreams of warm soil, hot sunshine, and tiny green buds and leaves poking up bravely into the world are becoming closer and closer to real.


Whether you make this tonight, or use leftover potatoes and cabbage later, this is a delicious and filling meal that everyone will love, regardless of heritage.

Colcannon Ingredients

Ingredients:

  • 1 head of red or green cabbage
  • 1.5-2 pounds potatoes
  • 1 pound ground beef
  • 1/2 stick butter (or 1/4 cup oil of choice)
  • 1/2 cup milk (or water, or stock)
  • Salt & Pepper
  • Optional: 1/2 an onion, diced; garlic salt

Cabbage & Potatoes

Step 1: Dice the potatoes into cubes, you can use any kind.  I leave the skins on because that is where the majority of the nutrients and minerals are found, but you could peel them.  Cut out the hard core of the cabbage, and shred the head or cut into thin strips.

Boiling potatoes

Step 2: Bring a large pot of water to a boil, and add the potatoes.  Simmer for at least 25-30 minutes, until soft when poked with a fork.

Steaming cabbage

Step 3: In a large covered pot, add the cut up cabbage with a few tbsp water or stock (or wine, or vinegar) and heat over medium heat for 10-20 minutes, until cabbage becomes soft and translucent.  If using onions, add at this time too.

Ground beef and cabbage

Step 4: In a large pan, brown the ground beef (or chicken, or turkey, or pork).  Drain off the excess fats.  You can use the same pan if you remove the cabbage.  Add the cooked softened cabbage back in.

Mashing potatoes

Step 5: Drain the potatoes, and mash it up to your desired consistency, whether totally smooth or with chunks.  Add the butter and milk (or other liquids) and mix well.

Mashed potatoes and cabbage

Step 6: Add the mashed potatoes to the pot with cabbage and ground beef and mix well.  Season to taste with salt & pepper.

Irish Colcannon in pot

That’s all there is to it!  Three classic mainstays of Irish cooking, cabbage, potatoes, and meat, together in one happy marriage.  Serve with gravy if desired.  If you are clever about cooking order, you can make this all in one pot too.  This makes a huge amount, so be sure you have plenty of people to share it with or will eat it over time.  You can of course halve or quarter the recipe as needed.

Beefy Cheesy Enchiladas


You know how some days you just don’t want to cook?  Well, I’ve had more than my usual share of those lately.  I usually have a whole list of simple “throw it together” meals just for this reason.  You know, like pasta.  Or cereal.

But the other day, even those seemed like far too much work.  I just… couldn’t.  So I figure, we can order something to go and pick it up, no problem.  Well, did I ever find a keeper.  My fiancee says, no worries, I will cook tonight!  I’m immediately intrigued.  I figure there’s now a 98% chance I’ll be eating burritos.  (Trust me, that’s maybe an under estimation).

What are you going to make?  I ask, as he starts poking around in the refrigerator.  Oh, you’ll see… is the only answer I get.  He’s a man of many mysteries.

With a glass of wine, I settled in to watch the meal unfold.  I could almost see the wheels turning in his head as he pulled out one ingredient after another.  Ground beef… frozen peppers… shredded cheddar cheese… Do we have corn tortillas?

I’m 100% sure it’s burritos now, and ask him as much.  No… not exactly. And your one guess is gone now.  Hmmm…

Ingredients:

  • 20 small corn tortillas
  • 1 cup shredded cheddar cheese
  • 1 pound ground beef
  • 1/2 bell pepper, diced
  • Jar of jalapenos
  • 2-4 tbsp butter
  • Chili powder
  • Salt & pepper
  • 2-3 tbsp flour
  • Optional: refried beans & rice

Corn tortilla for enchilada in pan

Step 1: First he browned the beef in the pan, adding in some chili powder.  After removing that and setting it aside, he diced the peppers finely, and added it to the pan with the butter and a healthy splash of juice from the jarred jalapenos (which I made last spring).

Enchiladas being prepared

Step 2: One by one, over medium-low heat, each tortilla was placed in the pan until softened (to add flavor, he said) and then moved to an aluminum pan.

Putting cheese in the enchiladas

Step 3: Each soft tortilla had a healthy handful of beef added, and a big pinch of cheese.  AHA!  You’re making enchiladas!  He smiled, you got it!  Awesome! … but I was basically right, because enchiladas are just baked burritos.

IMG_3334

(Sneak peek of the gorgeous finished product!)

You can use other fillings here too, I didn’t even have to ask but he made a few veggie burritos for me, with black beans, spinach, and mushrooms!  Try more peppers, onions, or different types of beans.

Enchiladas in pan ready for oven

Step 4: For the sauce, he simply added a few tbsp flour to the juices still left in the pan to thicken it up.  With the pepper chunks in it, he poured that over everything, and sprinkled on more cheese (of course).

IMG_3322

Step 5: Put into an oven preheated to 350 degrees, and bake for 20-25 minutes, until cheese is melty and bubbly.

IMG_3324

This is the lovely finished product!

IMG_3327

Top as you like.  We had some cilantro left from a previous Mexican night, as well as salsa, sour cream, and of course more jalapenos!

IMG_3328

Throughout the process, rice had been cooking in the rice cooker, and it went off just as the enchiladas were about done.  With a can of refried beans, the meal was complete.

IMG_3332

A fiancee-approved meal!

IMG_3330

I also had some lime wedges, which I think are just about required with Mexican food.  The tartness helps cut the spice a little.  Plus it looks nice.  🙂

I’ll need to not want to cook more often…

Budget Epicurean: Health Coaching


Dear Readers,

Exciting news! The Budget Epicurean has been pursuing an Integrated Health Coach certificate through the Institute for Integrative Nutrition this past year, we are about halfway through. However, between online schooling, a new career move, and an upcoming wedding, my plate has been overflowing!

Down side is, I will have to cut back my blogging to once weekly for now. I will do my best to post the best material and/or recipes each week, on Sunday. Once the workload eases I may try to switch back to my 3-per-week posting schedule. But don’t fear, there is still a very large archive of fabulous BE stories and recipes to be perused at your leisure.

This site is a treasure trove of Vegetarian meal ideas, creative Beverages, Slow Cooker recipes, my signature “Less Than Five” section, and informative posts on a wide variety of topics. Search any term and see what you might find.

I am excited to announce that I am now offering Free Health History Consultations! This means you fill out a 2-3 page form, then email me and we can talk over the phone (or in person if you’re lucky enough to live in CT!) and see if Health Coaching is right for you. See my Health Coaching page for more info.

Just click on the form below most relevant to you, and save or print it.  Then shoot me an email at BudgetEpicurean @ gmail .com and let me know you want to talk. I’ll contact you and we can go over the form together, to see if there is any area in your life where I can be of support and service.

Women’s Health History Form

Men’s Health History Form

Non-Gendered Health History Form

I can’t wait to help you achieve your healthiest, happiest you!

BE Health Coaching IIN Links

For questions or to request a FREE health history consultation, please email jenhealthcoaching@gmail.com.

Mixed Winter Vegetables


Towards the end of February, it seems like nothing will ever grow again, and a juicy summer tomato is but a dream.  Most Americans just go to the supermarket and buy whatever exotic fruits or produce they are craving with no regards to whence it came, how many miles it has traveled, or how the nutrients have been degraded by early harvest and long travel time between dirt and plate.

I strongly encourage those yearning for the warmer days of spring where every corner bursts with greenery to make use of the oft-neglected seasonal produce.  Try searching Local Harvest for farmers markets near you.  Root crops store so well, while cold-tolerant crops are appearing in local markets.  If you are lucky you may even have farmers with greenhouses or cold hoops that grow tender baby greens and lettuces.

Many people cannot name 5 produce items that are in season any time of the year other than mid-summer, and maybe not even then.  During the coldest, bleakest times of winter it is especially hard to think of produce actually being able to withstand the harsh temperatures.  But in New England, there are tons of vegetables that you can find for mere pennies at the local markets, including: carrots, fingerling potatoes, beets (red and gold), rutabaga, squash, parsnips, turnips, radishes, leeks, onions, Brussels sprouts, baby micro-greens, spinach, kale, collards, and mushrooms.

This recipe makes a large meal for one, or side dish for two.  Feel free to mix up the vegetable content based on what you have available right now and what you like.  But if you are wary of these produce types, just try one and see how you like it.  You never know when you may fall in love with the sweetness of a golden beet, the carrot-like texture of parsnips, or the nuances of various radish strains.

Ingredients:

  • 1 parsnip
  • 1 leek
  • 1 carrot
  • 2 garlic cloves
  • 2 green onion
  • 1 small potato
  • 3-4 small beets
  • 3 tbsp olive oil
  • 2 tbsp lemon juice or vinegar

photo 1 (1)

Step 1: Cut the tops and bottoms off of your produce, and dice into chunks or slices.  Add the olive oil & lemon to a frying pan, and add all the vegetables.  Cover tightly, and steam 5-10 minutes.  Stir up the veggies, cover, and steam another 10 minutes or so.  You want the heat low enough that it will slowly caramelize the sugars in the vegetables, not burn them.

photo 2 (1)

Step 2: Sprinkle with salt & pepper to taste.  Either serve alone or on the side with a meat and salad.  I enjoyed mine with some roasted chicken, baby greens, and homemade sauerkraut on top.  It is so simple, yet so wonderfully tasty!


Eggs in a Green Nest


One of the hardest hurdles when transitioning to healthier eating, at least for the majority of people, is eating leafy greens.  We all know that leafy greens are the healthiest things out there.  They contain tons of vitamins, minerals, and antioxidants.  They cost us next to zero calories to consume.  Greens are full of digestible and indigestible fiber to keep your digestive system strong and healthy.

So why do they taste so bad?

Foods which to us taste bitter have an array of compounds in them that naturally protect the delicate leaves from insects who would love to snack at the salad bar of nature.  It is these compounds which tend to be so beneficial for our health.  Unfortunately, humans usually dislike the bitter taste at first.  Fortunately, you can re-train your taste buds to enjoy bitter, and there are many cooking techniques to make bitter foods more palatable.

Adding small amounts of high quality fat like olive oil, or a sour taste like vinegar or lemon juice, can help temper the bitterness of greens.  Sea salt or other salty sources like hard cheeses also helps mask the harsher flavors and draw out the sweeter notes.  My recipe for simply sauteed power greens uses these techniques to create a delicious side dish that even most greens-haters can enjoy.

Greens and Egg

In this simple breakfast recipe, I combine those techniques with fresh eggs for a superstar breakfast that is ready in under 10 minutes, packed with vitamins and nutrients and protein, and will keep you happy and full all morning long.  Enjoy over some brown rice or with whole wheat toast for a well rounded meal.


Ingredients:

  • 1-2 fresh organic eggs, if possible
  • 1 large bunch greens (kale, collards, mustard greens, etc) or a mixture of greens to make about 1 – 1 1/2 cups
  • 1-2 tbsp olive oil
  • 2 tbsp lemon juice or apple cider vinegar
  • 1 tbsp hard, salty cheese such as Parmesan
  • Optional: 1-2 slices wheat bread or 1/2 cup brown rice

Greens in Pan with Egg

Step 1: Rinse your greens to remove any dirt, and slice into thin strips or shred by hand.  Add the oil to the pan, then the greens, and drizzle with lemon juice.  Cover with a lid, and steam the greens for 5-7 minutes.  Optional: you can add a chopped clove or two of garlic

Greens and Egg Yolk and Toast

Step 2: Mix the greens, they should be bright and slightly wilted now.  Use a spoon or spatula to make a small indent in the pile of greens, and crack an egg into the hole.  Cover again, and steam for another 5-7 minutes.  The longer you cook the egg, the more well-done the yolk becomes.  5-7 minutes will leave it slightly runny, as in above photo.

Once the egg is cooked to your desired done-ness, remove to a plate and serve!  I sprinkled a little hard cheese over the egg, which gives it the perfect salty balance to the tart & bitter greens.  You can also use sea salt for the same effect.

You can easily increase this recipe to feed several more people, simply increase the volume of greens and crack in one to two eggs per person.  This is delightful plain with toast, or you could serve with black beans, salsa, hot sauce, relish… whatever floats your culinary boat.


Parsnip, Potato, & Leek Spring Soup


I don’t know about the weather elsewhere, but the weather here in Connecticut seems to be very bi-polar.  One day it is in the 50s and sunny, and I am getting cabin fever and want to plant everything in the seed catalog immediately, the next day we get almost a foot of snow dumped on us overnight.  What’s going on here?

I am so thankful that CT has some amazing farmers who have hoop houses, green houses, store rooms, and other ways of extending our crazy growing season, so that we are already getting some of the first tender crops of the springtime.  Though not quite yet asparagus season, we have access to several root crops (beets, parsnips, onions, potatoes, leeks…), winter squash, eggs & meats, and tender fresh greens (grown inside of course).

Spring Farmers Market Foods

Usually I plan the week’s meals before going to the store, but I decided to get crazy this week, and let the market make my meal plan.  Whatever was fresh and available, I will form the week’s meals around that.  This is one small step on my lifelong journey to be a locavore (to eat whole seasonal foods grown as close to me as possible as often as possible).

A big bag of fresh microgreens, spinach, and head lettuce means tons of fresh salads.  Healthy brown eggs means breakfasts, frittatas, and quiches.  CT grown oyster mushrooms may be grilled, sauteed, added to soups, or stir fried.  The fingerling potatoes will complement just about anything, and the beets too have many many options.

Soup spices whole

The first dish I decided to make (after a giant fresh greens salad, because I couldn’t wait and helped myself almost as soon as I got home) was a slow cooker soup.  I had obtained leeks, parsnips, and fingerling potatoes.  Combined with onions I had over-wintered, fresh ground spices, and canned turkey broth (from Thanksgiving!) it would be the perfect thing on a chilly snow-covered day.

Parsnip Potato Leek Soup Ingredients

Ingredients:

  • 1 large parsnip (or carrot)
  • 1 large leek
  • 3-5 small potatoes
  • 1/2 medium onion
  • 2-3 cups bone broth, vegetable broth, or water
  • Optional spices: black pepper, fennel, cumin, sea salt, garlic

Spring soup in the crock pot

Step 1: If using fresh whole spices, grind them up in a coffee or spice grinder.  In a crock pot or small soup pot, add the broth.  Wash the outside of the produce, but leave the skin on.  Dice up the potatoes, parsnip, onion, and leek and add to the pot.  Add water to cover.

Step 2: Cook in crock pot on “high” for 4 hours or “low” for 6-8 hours, or bring to a boil on the stove, and simmer for 1-2 hours. Serve fresh with a drizzle of olive oil and maybe some thick bread or rolls.


Spring Microgreens Salad with Beet Vinaigrette


As spring slowly begins to win the seasonal fight with winter, tender crops begin to appear in the local markets.  Radishes, greens and lettuces, root crops, winter squash, carrots, onion and potatoes both old and new along with greenhouse grown herbs, eggs and meats and dairy, and mushrooms abound.  Take advantage of fast-growing baby greens and all the chlorophyll and concentrated nutrients they offer with lots of fresh spring salads!

photo 3

Basically any meal starts off right with a heap of greens of any kind, topped with various seeds, nuts, vegetables, or proteins of your choice.  Choose darker or colorful varieties for the most nutrition, including kale, spinach, sprouts, arugula or rocket, and watercress.  You can also whip up your own salad dressing at home in the time it takes to mix & shake, and it will be far tastier, healthier, and cheaper than a plastic bottle full of chemicals.

photo 4

All  you need is a mason jar, an oil, an acidic (vinegar, lemon juice) and flavorings (fresh or dried herbs/garlic/pepper).  This recipe is for a beet juice vinaigrette, which has tons of delicious flavor, liver-cleansing benefits, and as a bonus is a lovely pink color!  I’ll bet you topping any salad with this will automatically make you smile.  For the beet juice, you can either roast and juice fresh beets, or you can use the juice from canned beets, no judgment here.

photo 2(5)

Ingredients (makes about 2 cups salad dressing):

  • 1/2 cup olive oil
  • 2/3 cup apple cider vinegar
  • 1/2 cup white balsamic vinegar
  • 1 tsp fresh ground black pepper
  • 1/2 cup beet juice
  • 1 heaping tsp miso


Step 1: Put all ingredients into a mason jar or other jar with a lid, and shake it up until emulsified.  The miso may take a bit to dissolve, but it’s worth it.  It adds a salty depth of flavor and a healthy boost of probiotics.  Refrigerate for up to 1 month.

photo 5

To make this lovely salad yourself:

  • 2 cups fresh mixed baby greens
  • 1/2 can sliced beets
  • Handful of almonds
  • 1 tsp chia seeds
  • 1/2 cup artichoke hearts
  • 1 tbsp dried cranberries
  • 3-4 tbsp beet salad dressing

Place the greens on a large plate.  Add the beet slices (save juice for the dressing), artichoke hearts, nuts, seeds, and berries.  Shake up your vinaigrette and pour over all.  Smile, and enjoy!

Feel free to experiment with your salad dressing.  Try using lemon juice or lime juice, add chopped fresh herbs like mint, parsley, or cilantro, add crushed fresh garlic or peppercorns, use any kind of vinegar or oil you want.  It is so quick and easy, you are bound to find recipes you enjoy, and may never go back to store-bought dressing again!


Have you made your own dressings?  What is your favorite recipe?