Category Archives: Holidays

Recipes specifically for or about any American holiday

Gift Idea: Altoids Survival Tin


With Christmas mere days away, the panic of gift-giving may be setting in.  It is unfortunate that a holiday meant to be about love and family and reflection has instead become a race through the mall and price-comparing online… but I digress.

For anyone who has a friend or family member who is “that guy” (or girl), you know the one, super hard to buy for, they have everything they already want, or they don’t really want anything, I have a solution that will make both them and you happy!

The Altoids survival tin.

IMG_6273-1024x764

That’s right folks, a harmless little $1 or $2 tin of mints can be transformed into an actually useful, potentially even lifesaving gift with just a little time and creativity.  Based on what you already have laying around your own house, it may even end up being a free gift!

And it will certainly be unique.  (Unless your giftee is a hard-core preparedness and/or survival expert, then they probably have a few dozen kits like this, and much fancier. But it is still the thought that counts, and I’m sure they are never mad about extra prepper gear!). You can get kids involved too, they love to come up with fun ideas for tiny, useful items, and tetris things together until they fit.  It becomes a game of how much can you stuff into this tiny box!

IMG_6276

For these kits, all you need is a small Altoids tin (or any other small, sealable metal tin) and an assortment of survival related items. There are infinite sites around the internet with suggestions and recommendations on what to add to these kits, ranging from meds to tarps to fire starting equipment.  Some even show youtube videos on how to turn the tin itself into a knife or saw, which you should only attempt if you are educated on how to use the tools to do so.

It is best to take into consideration the personality of the person you are creating this kit for, and the likely scenarios in which they could need this.  It could be a beauty emergency kit for a female friend, in which case you would want to include things like hair bands, bobby pins, safety pins, oil blotting papers, Q tips, and maybe tiny samples of makeup or makeup remover pads.  It could be a “Bad Day” emergency kit, and contain things like a mini bottle of wine, pieces of chocolate, and uplifting sayings on pretty paper.

IMG_6275

For the preparedness/emergency kit, you want to include things like pain medications, matches and candles, ways to collect or purify water, and items that have multiple uses like string.  Keep in mind that even things used to hold together other items, such as electrical or duct tape, string, or rubber bands, can themselves be useful too.

The kits shown above contain:

  • 3 matches taped together with electrical tape
  • 2 small birthday candles
  • 3 feet of string tied with a twist-tie
  • A toothpick
  • A safety pin
  • 1 antibacterial moist towelette
  • 2 Band-Aids
  • 200mg ibuprofen tablet
  • 1 ml of bleach in a sealed plastic tube
  • 1 small trash bag (to hold water to add the bleach to, or provide a tiny bit of coverage from rain or sun)
  • 1 stick of gum
  • 1 packet of lettuce seeds
  • A rubber band to hold it all together

IMG_6274

The beauty of this kit is that it is tiny enough to fit into a pocket, so for something as simple as a road trip or a camping trip or going to work in the city, your recipient can know that they have a small advantage should the S hit the F.  Happy gifting!


Have you made a survival tin like this before?  Do you have other things you would add or take out?  Share your thoughts in the comments!

Pumpkin Cheesecake Shots


With Thanksgiving past, and Christmas looming, the flavors of fall still linger and mix with the onset of winter.  Pumpkins and gourds are in abundance.  Ginger and cinnamon scents fill the air as cookies bake, while the crunch of fallen leaves give way to pine scented boughs and trees.

And pumpkin spice flavored <insert anything here> is still king.

While you are rushing about grocery shopping, house cleaning, gift buying and wrapping, you may need a few moments to yourself amidst the chaos.  Especially if you will be hosting or staying with family (for multiple days), an adult beverage is always welcome.

With the ubiquitous pumpkin spice creamer, plus just a dash of two other players, you can whip up an amazingly delicious sugar-bomb of holiday spirit!  Careful, this stuff is so good, it’s easy to lose track of how many you’ve had!

This recipe makes enough for 4 shots, or 1 large glass over ice.  Feel free to whip them up as needed, or make a large container full and keep it in the fridge.  You know… just in case…

Pumpkin Cheesecake Shot Ingredients

Ingredients:

  • 1 shot cake flavored vodka
  • 1 shot Khalua
  • 2 ounces pumpkin spice creamer

Pumpkin and Pumpkin Cheesecake Cocktail

Combine all ingredients in a glass over ice and mix.  Strain into shot glasses, or drink as a beverage.

I just made up a double batch, and keep it in the refrigerator in the mason jar the creamer was in originally.

I make my own flavored coffee creamer occasionally; you can follow this recipe from The Nourishing Gourmet, or if you’re vegan try this one from Girl Makes Food.


Christmas Tree Appetizer Tray


With the holiday season come holiday parties. From friends to family reunions, cocktail hours and work gatherings, the holidays are rife with opportunity to eat things we normally wouldn’t, shouldn’t, and far more of them. You could choose to just eat yourself into a coma every week and deal with the consequences later. You could live a puritanical existence for the next few weeks, exercising iron will over all sweets and tasty delights. Or…

You could choose better options. You could nudge family, friends, and co-workers in a healthier direction. You could provide healthy yet delicious treats, so you know you will always have something healthful to enjoy at any get-together.

I know which option I choose each year.

Would you like to know the answer to one of life’s biggest questions? How can you be both happy and healthy all the time? The key to health and happiness, is moderation. Go ahead and indulge in the things that truly bring you joy, like the cookies you look forward to all year, spiral-sliced holiday ham, or your aunt’s amazing casserole. But know that means you must cut back in other areas. Don’t have every appetizer offered, three cups of eggnog, seconds and thirds at dinner, followed by an entire angel food cake roll.

And by bringing healthier options to any party or gathering, you virtually guarantee yourself at least one option that will be “safe” and you can indulge as much as you like. You are also giving everyone else at the party a healthy option they may not have considered previously.

Christmas tree healthy appetizer tray

This is an appetizer tray my mother had made for a party last year.  You will notice that it not only looks very appealing, with its holiday themed tree shape, but it also has a whole cornucopia of options from broccoli to cheeses, to olives and grape tomatoes. This would be awesome to serve with a healthful dip on the side such as Black Bean Hummus, Lean Green Guacamole, or Radish, Onion & Herb cream cheese dip.

How to create an appetizer tree:

  • 1 large head broccoli
  • 1 can black olives
  • 1 small jar green olives
  • Assorted cheese cubes
  • 1 pint cherry tomatoes
  • Handful of pretzel sticks
  • Any other dipping veggies, cut into cubes or sticks

Step 1: Dice all your veggies into bite size pieces, and cube the cheeses.  Drain the olives.

Step 2: In a large pan or on a serving platter, arrange the cheese and vegetables in layers, including at least 2 large layers of broccoli for the green color. Finish with a handful of pretzels on the bottom for the tree trunk.

You could get very creative with this, for example by including “ornaments” on the tree by using different colors of vegetables or fruits, or making different shapes.  You could use cauliflower, red bell peppers and tomatoes to create a santa hat shape, or other types of finger foods arranged to look like wrapped gifts.  Let your imagination run wild, and watch as the crowd gobbles up healthy nibbles happily!

Thanksgiving Post Roundup


Thursday of this week is the American holiday of Thanksgiving.  The Budget Epicurean will be on a short holiday in honor of this tradition.  Whether you are at home, or at work wishing you were home, traveling or not leaving your house, here are some holiday favorite articles about Thanksgiving:

And as for the food…

I am thankful for all my wonderful readers!


Feel free to leave a comment below! What are you cooking this year? What are you thankful for?


Mom’s Special Cranberry Sauce


With Thanksgiving just around the corner, I am getting ready for cooking up all the associated goodies.  If you are lucky enough to have a mom, aunt, grandmother, etc who has special family recipes that have been passed down over generations, do yourself a favor and start to learn those recipes.  Instead of watching cartoons or football, get into the kitchen and help out.  You never know when it will be your turn to feed yourself, your family, or your whole neighborhood.

This recipe is passed down from my fiancee’s mother.  It is hands-down his favorite Thanksgiving dish, so much so that his mom usually makes a double recipe just so he can have one whole batch to himself.  I also doubled the recipe, and it was still all gone within two days.  You can easily multiply this recipe to make as much as you need, this makes about 10 cups of sauce.

It is a perfect blend of tangy cranberry and sweet from the sugar.  The orange juice and orange peel gives it a nice depth of flavor, and you can adjust the other spices such as cinnamon, nutmeg, clove, allspice, etc to your own liking.

IMG_6402

Ingredients:

  • 1 can crushed pineapple
  • 1 cup white sugar
  • 1 cup brown sugar
  • 1 16 oz bag cranberries
  • 1 cup orange juice
  • 1/4 cup grated orange peel
  • 2 tbsp cinnamon

IMG_6403

Step 1: Put the orange juice in a pan and bring it to a boil.  Rinse the cranberries and add them to the pot.

IMG_6407

Step 2: Add the sugars and the entire can of crushed pineapple.

IMG_6406

Step 3: Then add the spices.  You might want to make sure you use a pot that will be big enough to hold everything…

IMG_6404

Step 4: Grate the orange peel.  Try not to get any white pith in there. Add it to the pot,  mix well.

IMG_6419

Step 5: Simmer for at least 1 hour, until the cranberries begin to burst and liquefy.  It will thicken as you cook it down, and will thicken even more upon cooling.

This stuff is so good, I don’t even have a picture of the finished product! The recipe is great for doubling or tripling, and freezes well.  This can easily be made up to a month ahead of time, and simply reheated the day of, for an easy time-saver.

Spider Web Taco Dip


This dip is super easy, it takes less than 30 minutes to put together! And with just a little bit of creativity, it turns into a perfect Halloween party appetizer, sure to please all your spook-loving guests.

IMG_5759

Ingredients:

  • 1 can refried beans
  • 1 block cream cheese
  • 2 tbsp taco seasoning
  • 1 cup salsa
  • 1 large head romaine or 1 cup spinach
  • 1/4 cup shredded cheese
  • 4-6 tbsp sour cream
  • 1/2 can olives
  • 1 zip-lock baggie
Step 1: Mix the refried beans and the taco seasoning together.  In a casserole dish, spread the refried beans into a thin layer with a spoon.  Bring the cream cheese to room temperature, or heat briefly in the microwave, until you can spread it on top of the bean layer.
IMG_5760
Step 2: Spread the salsa over the cream cheese layer.  Shred the lettuce or spinach, and layer that on top.  Then add the shredded cheese.  Spoon the sour cream into the zip lock baggie.  Use scissors to snip off a corner, and pipe a spider web on top.  Scatter black olives around.
.
To make olive spiders: Take 2 olives and slice in half, then into thin slivers.  These will be the feet.  Take another olive and cut in half.  This is the head.  Lay one olive on its side, then the half-olive just next to it.  Add 4 thin slices on each side for legs, and your creepy-crawly treat is party-ready!
.
Happy Halloween!


Double Burger with Creamy Chili Coleslaw


Happy September!

As we head into Labor Day weekend, we all have some reasons to be bittersweet. The summer ending is bound to be a little bit sad, as we bid adieu to extra-long days of sunshine, warmer temperatures, cookouts and backyard barbecues, possibly more free time and relaxation than usual, and quality family time if you have little ones.

Those of you that do entertain spawn over the summer months, are probably eagerly anticipating the return to school (or overjoyed that they are already gone!) And there are the many joys of autumn to look forward to as well, pumpkin-pie everything, leaves changing colors, brisk nights and cooler days, and many fun holidays.

As summer winds to a close, perhaps you are going to celebrate with a little outdoor grilling? I know I plan to! (Though for this or any burger recipe, you can also cook the patties inside in a frying pan or broil in the oven. In case the desire for grilling hits mid-December).

IMG_9663

For this burger, we went all-in, with a double-wide bun to accomodate two patties, as well as loads of yummy toppings and my fabulous creamy chile coleslaw! But feel free to top it however you want, and say sayonara to summer in style. This recipe makes 1 double-burger, and could be split into two singles.

Ingredients:

  • 1 large hoagie-style bun
  • 2 burger patties (frozen, fresh, or homemade)
  • 2 slices cheese of choice
  • 3-4 tbsp coleslaw
  • 1 large roma or 1 small beefsteak tomato
  • 3-4 slices of pickle

IMG_9654

Step 1: Clean & spray your grill with nonstick cooking oil.

IMG_9658

Step 2: Set the grill to medium heat, and cook burgers 3-4 minutes each side, until desired done-ness. (The tougher the burger feels when you poke it, the more done it is. Medium is about the feeling of your thumb muscle when lightly closing your fist)

IMG_9659

Step 3: Top patties with the cheese in the last 1 minute of cooking to melt it on. I used white American, but feel free to use whatever you like, or no cheese at all.

IMG_9660

Step 4: Put the patties on the bun, smear the coleslaw on the opposite side. Layer on other toppings.

IMG_9661

Step 5: Quickly flip the two sides together, trying not to lose all the slaw in the transaction. Smush it all together.

IMG_9665

Step 6: Nom it! These guys came out absolutely perfectly, the creamy yet tangy slaw was a perfect addition, along with the fresh tomato slices right out of the garden (ya’ll know its the height of tomato season!) and salty pickles.

Other topping ideas include: hummus, salsa, guacamole, crushed potato chips, onion rings, lettuce, and classic condiments like ketchup, mustard, and mayo.


Happy Labor Day weekend!


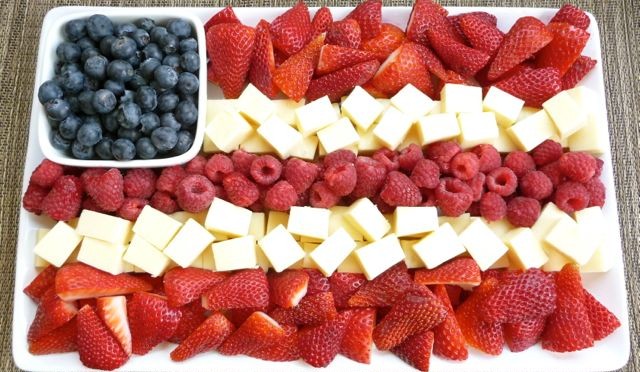
Red, White, Blue & Good For You!


My, how time flies when you’re having fun! Can you believe it’s nearly time to celebrate Independence Day by eating ourselves sick and blowing things up? It’s the American way.

I’ll leave the blowing things up and lighting things on fire part to my fiance; as for me I will be covering creative kitchen duty. The grill will be fired up all weekend long, patriotic beverages will be flowing, and family will be sharing stories and laughs as we wait for dusk and fireworks to light up the sky.

Hope you find some last-minute inspiration here for your own Fourth Festivities! God Bless America.


Yes, I know these aren’t red, white & blue, but rather green, but still… aren’t they adorable?! And if you find a way to make basil blue, bless your heart and patent that immediately. Or share with me…

Caprese Appetizers on a Stick

Caprese Party Skewers

How about a patriotic fruity salsa to get the party started? Serve with blue tortilla chips, or a white or dyed-red hummus. This would also be a delicious salad topper.

Red White and Blue Salsa

Red, White and Blue Salsa

For a hearty main dish that impresses with its presentation, look no further! Lasagna is always a sure crowd-pleaser, and is easy to adapt to vegetarian, vegan, or gluten-free diets based on the pasta noodles and contents.

Flag Lasagna

4th of July flag lasagna

Since that grill is fired up anyways, why not make your burgers make you want to sing the national anthem? Bleu cheese is tangy, tasty, and naturally punny on this national holiday. Stock up on thick tomatoes for slicing & some stinky cheese for some delightful:

Red White & Bleu Burgers

Red White and Bleu Burgers | 2CookinMamas

And of course, no picnic or party is complete without something sweet. We all have a sweet tooth, some more voracious than others, and luckily red & blue are natural berry colors! Therefore, strawberries, raspberries, blackberries, & blueberries lend themselves well to patriotic desserts.

What is cuter than a personal-sized-serving of a refreshingly light dessert? Not much!

Strawberry Shortcake in a Jar


For a bolder presentation piece that is super simple to create, how about this pretty berry tart? Guests, family, and friends will be wowed at whatever design you dream up on top.

Summer Berry Tart

Summer Berry Tart

If you have molds already, you should definitely use this opportunity to whip up these delicious and quite healthy popsicles! In great American flair, these striped refreshers will keep the heat of the day at bay. Beware though, these colors will run in the sun!

Red White and Blueberry PopsiclesRed, White and Blueberry Popsicles (GF, DF, SF, V) - A Dash of Megnut

Last but certainly not least, we can’t forget to hydrate!

Of course, the best option is water; add a few fresh berries for a splash of color, or some sparkling water for interest. You can do the same with tea or lemonade, or dye it red or blue.

For the grown-ups in the crowd who like to imbibe during the celebrations, below is a great resource for several types of cocktails of varying ingredients and degree of strength. Use your best judgment and safety first always! Especially if sparklers are involved.

1. Fourth of July Cocktail 2. Strawberry Sucker 3. Watermelon Mint Cooler 4. Patriotic Margarita 5. Red, White and Blue HYPNOTIQ Blue Martini

Patriotic Cocktails

Happy Fourth!

Chicken Bacon Ranch Pasta Salad


With the Fourth of July weekend coming up, I’m sure many readers will be hosting or attending picnics, barbeques, and other backyard get-togethers.  A huge fan of casual parties myself, I am always on the lookout for fast, easy to put together side dishes that aren’t too expensive to feed a crowd. A good example is my prior post on BBQ Baked Beans.

Enter the pasta salad.

Pasta salads are insanely versatile. They adapt well to just about any type of veggie, meat, or cheese, with tons of creative dressing/sauce options as well. You could try a Greek mix of feta, banana peppers, onions, and kalamata olives, or a club mix of ham chunks, cheddar cheese, and crumbled bacon, or how about an Italian combo with salami, pepperoni, pepperocini, and swiss.

For this recipe, I had a pre-mix box ranch & bacon pasta salad, and decided to jazz it up a bit with some canned chunk chicken and fresh diced veggies. You can also use a pound of any type of pasta (the small shapes work best here, like shells, elbows, or penne), spices you like, and some crumbled bacon.

Ingredients:

IMG_9498

Step 1: Dice your zucchini and tomatoes, and drain the chicken. Get the water boiling for the pasta, and boil 8-10 minutes.

IMG_9499

Step 2: In a pan, cook the zucchini for 5-7 minutes, until beginning to brown. Add the tomato and chicken, and cook until heated through.

IMG_9500

Step 3: Drain the pasta, and mix in the veggies. Add the toppings included (or spices & cooked crumbled bacon) and the Ranch dressing. Stir well. Add more or less as needed.

This cooks up a nice big batch, and can feed a hungry crowd. The Ranch flavor works great with the bacon, pasta, and chicken. You can also use dried Ranch seasonings and milk or sour cream to achieve a similar yet different taste. As a bonus, you’ve snuck in a serving of veggies per cup!

Happy partying & God bless the USA!


This post contains links to Amazon affiliate products. Clicking these links and purchasing these items contributes to the maintenance of this blog without affecting your purchase price. Thank you.

Ham & Barley Soup


I don’t know about wherever you were in the world for April 20th, but happy first day of Spring! FINALLY! And… we got snow. About four inches of fluffy, wet snow. Eff you too Connecticut.

So rumor has it some big holiday thing is happening next week. As in, Easter is one week from today. WHO SAID IT COULD BE APRIL? Time needs to calm itself down, have a cup of tea, and stay awhile. Moving and starting new jobs doesn’t help, because you are insanely busy non-stop. Or so it feels like.

And once the weather remembers that it’s Spring now, it will just be crazier. Because I’ve got a window-full of happy sprouts just waiting for fresh tilled Earth! And so many new farmers markets to explore, restaurants to try, and seafood to enjoy!

Whether you celebrate the religious meanings behind Easter or just get excited about peeps and edible bunnies, it is just around the corner. And that means you are likely going to have the typical Easter ham. Even if not, you can take advantage of post-Easter sales and snap one up.

Ham & Barley Soup is a classic “dad recipe”. My dad is the expert, and has been making this for as far back as I can remember. As a kid I didn’t like it very much, but now that my tastes have matured it is one of my absolute favorite cold-weather dishes. Or anytime really. It’s so easy, and so flavorful! It is the perfect use for leftover ham and ham bones, will keep money in your wallet, and fill you up.

Ingredients:

  • Bones from one large ham shank
  • 12 oz pearled barley
  • 4-5 large carrots, cut into coins
  • 2-3 stalks celery, diced
  • 1 1/2 gallons water or stock
  • Optional: bunch fresh kale, torn, extra ham meat
  • Salt & pepper

IMG_6551

Step 1: For this simple dish, the magic is in the time. Simmering the ham bones in the water all day long brings out the depth of flavor. Put the water or stock in a large soup pot with any bones, and simmer for at least 1 hour, up to 12.

IMG_6553

Step 2: Add the carrots, celery, and barley. Simmer for another 30-40 minutes or longer, until everything is softened.

IMG_6555

Step 3: Season to your liking, add extra meat if you have it, or some spinach or kale.

IMG_6557

This soup is deceptively simple but addicting. It makes an awful lot, so be sure you will eat it over several days, are feeding a lot of people, or have some extra freezer space.

IMG_6586

This is the batch I added some kale to once it was cooked. I liked the extra greens, it gave some great color, extra nutrients, and tasted awesome all together. Give it a try, maybe next week!


[amd-zlrecipe-recipe:14]


This post contains links from the Amazon Affiliates program. By clicking on the links and making purchases from Amazon, a small portion of the profits goes to support this blog. Thank you!